
Deploying Ollama with OpenWebUI on AWS EKS
Published:
This blog post provides a step-by-step guide to deploying Ollama, an LLM server, and OpenWebUI, a web-based chat interface, on AWS EKS. It covers setting up an EKS cluster, deploying Ollama with a Persistent Volume Claim (PVC), exposing it via LoadBalancer Services, and configuring Ingress for external access. The guide also ensures that OpenWebUI is properly integrated, allowing users to interact with DeepSeek R1 through a web interface. By following this guide, users can successfully deploy, configure, and access their AI chatbot on AWS. 🚀
Deploying Ollama with OpenWebUI on AWS EKS
This guide provides step-by-step instructions to deploy Ollama (an LLM server) and OpenWebUI (a web-based chat interface) on AWS EKS. The process is divided into two parts:
- Deploying Ollama and Running DeepSeek R1
- Setting Up OpenWebUI for a Full Chatbot Experience
🚀 Prerequisites
Ensure you have the following installed on your local machine:
- Helm
- Kubernetes CLI (kubectl)
- AWS CLI
- An AWS IAM user or role with sufficient permissions to interact with the EKS cluster.
🟢 PART I: Deploying Ollama and Running DeepSeek R1
Step 1: Connect to Your AWS EKS Cluster
Since we are using Ajarem’s credentials, specify the profile:
aws eks update-kubeconfig --name uber-demo --region us-east-2 --profile novacloud-ajarem
Step 2: Create the ollama Namespace
Namespaces help in logically separating different workloads in Kubernetes.
namespace.yaml
This file defines a dedicated namespace ollama where all related resources will be deployed.
apiVersion: v1
kind: Namespace
metadata:
  name: ollama
To apply this configuration, run:
kubectl apply -f namespace.yaml

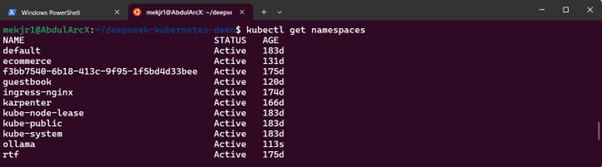
Step 3: Verify the Namespace
Ensure the namespace was created successfully:
kubectl get namespaces
Step 4: Deploy Persistent Volume Claim (PVC)
A Persistent Volume Claim (PVC) is used to request storage resources for persistent data. This ensures that application data is retained even when pods are restarted or rescheduled.
pvc.yaml
apiVersion: v1
kind: PersistentVolumeClaim
metadata:
  name: ollama-pvc
  namespace: ollama
spec:
  accessModes:
    - ReadWriteOnce
  resources:
    requests:
      storage: 1Gi
- accessModes: Specifies that the volume can be mounted as read-write by a single node.
- resources.requests.storage: Requests 1Gi (1 gigabyte) of storage space.
Apply the PVC configuration:
kubectl apply -f pvc.yaml
Step 5: Deploy Ollama and OpenWebUI
The deployment file defines how Kubernetes should run Ollama and OpenWebUI. It specifies the container images, environment variables, probes for health checks, and resource limits.
deployment.yaml
apiVersion: apps/v1
kind: Deployment
metadata:
  labels:
    app: ollama
  name: ollama
  namespace: ollama
spec:
  replicas: 1
  selector:
    matchLabels:
      app: ollama
  template:
    metadata:
      labels:
        app: ollama
    spec:
      containers:
      - image: ollama/ollama:latest
        name: ollama
        ports:
        - containerPort: 11434
        env:
        - name: CUDA_VISIBLE_DEVICES
          value: "-1"
- replicas: Runs a single instance of the Ollama pod.
- image: Uses the latest version of
ollama/ollama. - ports: Exposes the application on port
11434. - env: Configures the environment variable
CUDA_VISIBLE_DEVICESto disable GPU usage.
Apply the deployment:
kubectl apply -f deployment.yaml
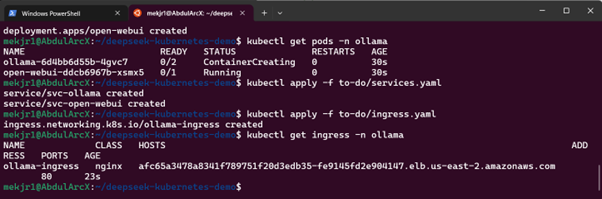
Step 6: Verify Ollama Deployment
Check if the Ollama pod is running:
kubectl get pods -n ollama
If successful, it should show the Running status. 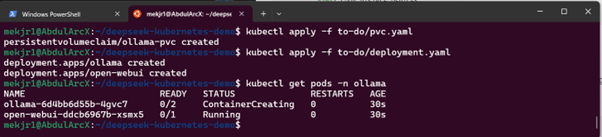
Step 7: Deploy Services
Services expose the applications to internal and external traffic.
services.yaml
apiVersion: v1
kind: Service
metadata:
  labels:
    app: ollama
  name: svc-ollama
  namespace: ollama
spec:
  ports:
  - port: 11434
    targetPort: 11434
  selector:
    app: ollama
  type: LoadBalancer
- type: LoadBalancer: Ensures Ollama is exposed externally.
- port: Maps traffic from port
11434to the container’s11434. - selector: Associates this service with the Ollama deployment.
Apply the service configuration:
kubectl apply -f services.yaml
Step 8: Deploy Ingress
Ingress manages access to OpenWebUI from the internet. It provides a friendly URL and handles traffic routing.
ingress.yaml
apiVersion: networking.k8s.io/v1
kind: Ingress
metadata:
  name: ollama-ingress
  namespace: ollama
  annotations:
    nginx.ingress.kubernetes.io/rewrite-target: /
spec:
  ingressClassName: nginx
  rules:
  - host: <your-elb-dns>
    http:
      paths:
      - path: /
        pathType: Prefix
        backend:
          service:
            name: svc-open-webui
            port:
              number: 8080
- ingressClassName: nginx: Uses the Nginx Ingress Controller.
- rules: Defines routing for the
svc-open-webuiservice. - annotations: Ensures proper URL path rewriting.
Apply the ingress configuration:
kubectl apply -f ingress.yaml
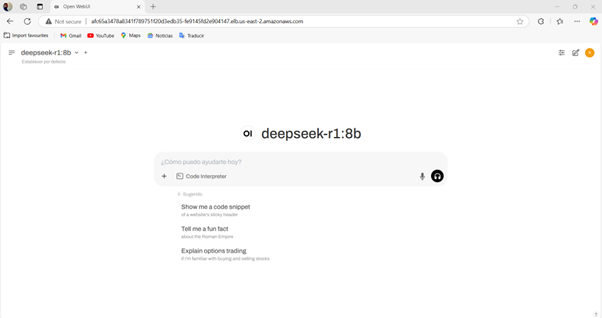
Step 9: Access OpenWebUI
Get the ingress address:
kubectl get ingress -n ollama
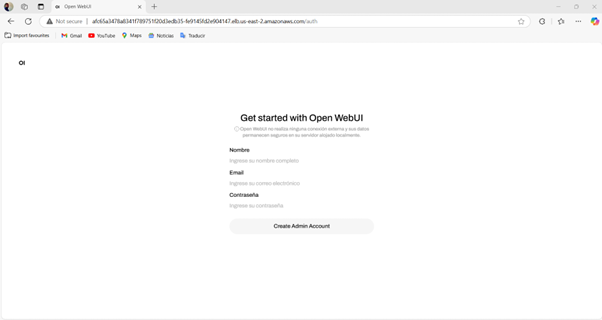
Then visit:
http://<INGRESS-HOSTNAME>

🚀 Summary
✅ Ollama is deployed and running the DeepSeek R1 model.
✅ OpenWebUI is installed and provides a web interface for chat.
✅ Ingress is set up to access OpenWebUI over the internet.
✅ Model loading and chat interaction is confirmed.
🚀 Enjoy chatting with your AI model! 🚀
Leave a Comment